Controls
| Joystick | Action |
|---|---|
| UP | Up |
| DOWN | Down |
| LEFT | Left |
| RIGHT | Right |
| ◯ ⬤ | Fire |
| ⬤ ◯ | Fire |
| ◸ ◥ | Fire |
| ◤ ◹ | Fire |
Destroyer
Complete your allocated mission to protect merchant ships, land troops and undertake supply runs, ensuring your destroyer isn't sunk in the process. Have you got what it takes to fend off lurking U-Boat Wolfpacks, diving fighters, sharp-shooting cruisers and much-feared kamikaze bombers?
Scenario
“Welcome aboard Captain! We hope you’re ready to face the many battles in this war.”
Do you have what it takes to fend off the lurking U-Boat Wolfpacks, diving Zero fighters, sharp-shooting Imperial Navy cruisers, and suicidal Kamikaze bombers? Can you safely shepherd a convoy across the stormy North Atlantic, or land your troops on the razor sharp coral beaches of some tiny tropical island in the far South Pacific?
Maybe you have what it takes, maybe not. You certainly have the rght tools, a Fletcher class destroyer and crew. These vessels are ideally suited as the guardians of the fleet. For the most part, these ships rely on their torpedoes and guns for offensive armament, while their machine guns, cannons and depth charges are used defensively.
OBJECTIVE
The overall objective is to fulfill your selected mission without being sunk. Each, mission will emphasize certain considerations such as protecting merchant ships, landing troops, moving supplies, etc. But if ten or more of your stations are damaged, your destroyer is sunk and all of your efforts will have been for nothing.
You must continually repair damage to your ship to remain operational - the various controlls will not work accurately until completely repaired. Main gun shells and depth charges are resupplied only after your damage team has completed all repairs (although torpedoes are not). Good luck with your selected mission. We’re depending on you.
(Refer to CAPTAIN’S NOTES for historical background information and to the GLOSSARY for definitions of ship terms.)
STARTING PLAY
The title screen will appear. Press the FIRE button (or Space Bar) to continue. Type in the name of your ship for this game and press Return. When requested, type in your name and press Return again.
Select one of 7 challenging missions, from introductory to advanced scenarios. First select the mission, then the difficulty level (easy, intermediate, or advanced).
Push the joystick FORWARD/UP or pull BACK/DOWN to change selections. The selection you are changing will turn yellow.
Move the joystick LEFT or RIGHT to change levels or missions.
Then use the joystick (or cursor keys) to get to START GAME and press the FIRE button (Space Bar). You will then receive your orders and a description of the scenario you’re to encounter. Press the FIRE button (Space Bar) to begin the mission.
SUBHUNTER — Use Sonar, Depth Charges, Navigation
You’re to seek and destroy an enemy submarine that has been sighted in your patrol area! Use your sonar to track the enemy submarine while maneuvering toward it. When your ship is above the submarine, attack with depth charges! Don’t let this one get away!
SCREEN — Use Radar, Anti-Aircraft Guns, Navigation
Your task force has been positioned south of you. To the north are a large number of enemy aircraft heading toward your carriers. You must protect them at any cost! Your radar will give you warning of the airplanes before they are on you, so you can ready the Anti-Aircraft guns in time to defend yourself.
SCOUT — Use Sonar, Radar, Weapons Systems
(dependent on enemy encounter) An important convoy must cross a treacherous strait. You are to scout the intended route for enemy patrols. You will be notified as you reach each check-point. Maintain radio silence until you return to base to make your report. Avoid combat to keep the enemy guessing as to your intentions.
BOMBARDMENT — Use Surface Guns, Radar, Anti-Aircraft, Navigation
The Marines are landing! You must shell key parts of the island and maneuver close to the beach to search for flashes of enemy gun emplacements. Silence them with your main guns, avoid the return fire, and destroy any enemy aircraft threatening the invasion beaches. A combination of good radar operation, keen lookouts and sharp shooting will be necessary to protect the amphibious assault.
BLOCKADE RUNNER — Use Surface Guns, Torpedoes, Radar, Sonar, Navigation
One of our small island outposts has been surrounded by enemy forces. The garrison requires certain critical supplies in order to hold out. You are to take your battle seasoned crew and run the blockade! All stations must operate at full efficiency as you will be facing multiple threats from ships, submarines, and fighters!
CONVOY ESCORT — All Systems Used
You have been assigned to lead a slow merchant convoy to a beleaguered outpost, deep in enemy territory. Your assigned position is the left front sector of the convoy’s advance, your sister ships are assigned to other areas. It is your responsibility to run interference for those ships and to see the convoy safely to the harbor on time - regardless of enemy action!
RESCUE — All Systems Used, Pilot Signals, Enemy Guns
A friendly pilot has been shot down in your area and made it to a small chain of islands. You must rescue him soon (his signal beacon is rapidly getting weaker) and get him back to base. As his position is behind enemy lines, speed and stealth are very important. The pilot will signal SOS with a mirror when he sees you approach, but beware - that flash might also be enemy gunfire!
CONTROLS
A destroyer can be a complicated ship to sail and fight with. To make control easier, all controls have been separated into stations. Each weapon type and sensor has a station, along with the Bridge and Damage Control.
All stations are shown on different screens. You can access these stations by typing in the two letter codes and then pressing RETURN. The commands (and any appropriate responses) will be shown on the message line located toward the bottom of the screen. Once a station has been selected, the controls are manipulated using the joystick (or cursor keys).
| Keyboard | Station |
|---|---|
| BR | Bridge |
| NA | Navigation |
| OB | Observation Deck |
| RA | Radar |
| SO | Sonar |
| GF, GA | Guns Forward/Guns Aft |
| AP, AS | Anti-Aircraft Guns Port/Anti-Aircraft Guns Starboard |
| TP, TS | Torpedoes Port/Torpedoes Starboard |
| DC | Depth Charges |
| DA | Damage Control |
There are also two additional codes to be used in particular circumstances:
| Keyboard | Info |
|---|---|
| TR | Used at the Surface Guns station to activate the Targeting Radar. |
| AB | When all else fails - Abandon Ship to end the current mission. |
Helm
There is a special set of controls that appears at the bottom of the screen on four of the stations above (Observation Deck, Bridge, Radar and Sonar). This special section is called the Helm. lt allows you to control the heading and speed of the ship. Push the joystick FORWARD/UP or pull BACK/DOWN (or use cursor keys) until the light flashes next to the item you wish to change.
STEER TO allows you to set the course you wish to follow. RIGHT and LEFT movements of the joystick (or cursor keys) will move the dial right and left. The new course setting is shown at the center of the dial under the marker. Press the FIRE button (Space Bar) to set it on automatic. The dial will turn black to indicate this, and the joystick has no effect until the FIRE button (Space Bar) is pressed again. (When on automatic, the AUT switch at the bridge reflects the same.)
CURRENT HEADING shows exactly where the bow of the Destroyer is pointing. It takes time to turn a 3,000 ton ship around, so don’t be surprised if you see this dial moving after a new heading (STEER TO) order is given.
SPD (The Throttle) controls the preselected settings for the engines, and therefore their speeds are measured as Full, Half, Slow, Stop, and Slow Reverse (shown as F,H,S,ST,S). Moving the joystick RIGHT and LEFT (or using the cursor keys) will move the throttle marker right and left to set your speed.
CURRENT SPEED displays the current speed of the ship in knots. As with turning, it takes some time to get a 3,000 ton ship moving.
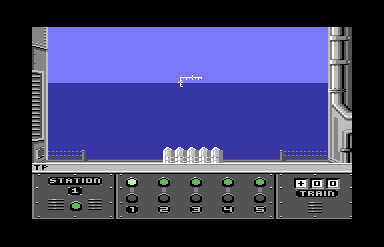
STATIONS
NA: Navigation
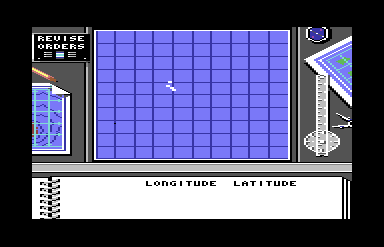
The particular path to be followed by the quartermaster (the sailor who actually turns the wheel) is defined on the map at this station. The view is of a map boxed off into 100 squares, each 5000 yards per side. The top is always North. Your position (blip) and the position of islands (squares), any friendly ships (moving dots), and your base (:•:) are shown on this map. You may plot a course with up to 4 destination points on this map. To follow this course, the AUT switch on the bridge must be turned on.
- To plot a course, first press the FIRE button (Space Bar). Then move the joystick to place point 1 on the spot where you want your next destination point, and press the FIRE button (Space Bar) again. A bullet will appear to the right of your log entry at the bottom of the screen. Repeat this procedure until you are ready to place your last turn, then press the FIRE button (Space Bar) twice. lf you are at the fourth turn, you will automatically be finished and do not need to press the FIRE button (Space Bar) twice.
- Replotting a course may be done when the Revise Orders Light (at the top left of the screen) is blinking.
- A record of your course is shown on the bottom half of the screen. The locations for your destination points are given in longtitude and latitude. As you reach each destination point, a second bullet will appear next to the log entry.
BR: Bridge
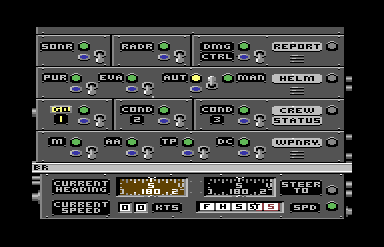
This is the brain of the ship Automatic function of the stations course settings, speed and crew reports are all available here. No other station contains as many controls as the Bridge. The view shows a control panel full of toggle, switches and dials. The dials are all located on the bottom of the screen in the Helm section.
- Push the joystick FORWARD/UP, or pull it BACK/DOWN to select which row of controls to change. The light at the far right of that row will flash to indicate which row you are on
- Move the joystick LEFT or RIGHT to move across the screen to the different switches. A control is activated when the blue light next to it flashes.
- Press the FIRE button (Space Bar) to turn the switch on or off. The light next to the switch is yellow when it is on and green when it is off.
The top row is for status reports for the Sonar, Radar, and Damage Control Stations. When each switch is toggled, a report will appear on the message line.
The second row from the top is for maneuvering orders from the Helm. Switches may be set for Pursuit (PUR), Evasive Action) (EVA), Auto (AUT), or Manual (MAN) Helm control.
PUR (Pursuit): The ship automatically follows the closest enemy sub. This releases you to concentrate your attention on sinking that sub.
EVA (Evasive Action): To run an erratic course so that enemy ships, submarines, and aircraft have a harder time hitting you.
AUT (Automatic): To follow the course defiined under the Navigation station. This frees you to patrol other areas and pay attention to your radar and sonar reports.
MAN (Manual): When a special maneuver is needed (For example, to bring your torpedo tubes to bear on an enemy ship or drop depth charges.) When this is selected, the present course is suspended until AUT is reselected. Manual controls are directed from the Helm.
The next row controls the Crew Status. There are three levels available, General Quarters (GQ or “Battle Stations’’), Condition 2 (COND2), and Condition 3 (COND3).
GQ (General Quarters): To turn on all weapon systems at one time. All weapons will fire automatically unless you go to a specific weapons station (Surface, Anti-Aircraft Guns, or Depth Charges) which then is under manual control.
COND2 (Condition 2): To turn on speciific weapons so that you may selectively attack or defend using just those weapons. (The weapons may be selected using the last row of switches.)
COND3 (Condition 3): To turn off all weapons at once. This is a quick and easy way to secure from general quarters. When selected, all weapons are turned off!
Note: Remember that if you leave any station at Battle Stations too long, the crew will become tired and not perform as well. If you don’t need a particular station; leave it off so the crew can get some rest.
The last row of switches controls individual weapon stations automatically. Note that paired weapons (Surface Guns, Anti-Aircraft Guns, and Torpedoes) are activated or deactivated as a pair.
M (Surface Guns): Activate/deactivate both the FORWARD and AFT guns. These are the weapons. you use to attack enemy ships or to pound enemy shore guns. AA (Anti-Aircraft Guns): Activate/deactivate both the Port and Starboard Ant-Aircraft guns. Only the Anti-AirGraft guns can shoot down aircraft.
TP (Torpedoes): Both the Port and Starboard torpedo stations are controlled by this switch. Torpedoes are only effective against enemy ships.
DC (Depth Charges): Mounted on the stern, Depth Charges are activated with this switch. Submarines may only be attacked by Depth Charges.
The bottom of the screen has the speed and heading controls and indicators called the Helm. The Helm controls are as described previously.
OB: Observation Deck
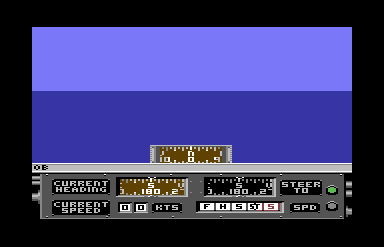
To see the tactical situation visually from any direction, you can use the Observation Deck. The Observation Deck has the same Helm controls as the Bridge, with the addition of another control for the viewing angle. The viewing angle is controlled by the dial located in the center of the screen. This dial allows you to turn and look in any direction of the direction your ship is facing, or to lock in a view in the ship’s current heading.
-
Push the joystick FORWARD/UP to select the window and press your FIRE button (Space Bar). The perimeter around the window will toggle from a light gray to a dark gray.
-
When the perimeter is light gray, move the joystick RIGHT or LEFT to change the viewing angle in any direction. Press the FIRE button (Space Bar) to lock in the forward view. The perimeter around the window will turn dark gray until you press the FIRE button (Space Bar) again.
RA: Radar
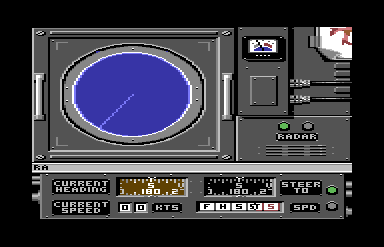
Radar allows a ship to spot enemy ships and aircraft at much greater distances than a telescope. Some course corrections may be needed depending on what is seen on the radar, therefore the Helm controls are duplicated here.
Radar operates on the principal of bouncing radio beams off of a ship or plane and timing how long it takes the beams to return. This gives the approxilmate distance. The direction the antenna is pointing gives the bearing to the target. The range of the radar is approximately a 13,500 yard radius. lslands are shown as squares, ships blips, and squadrons of airplanes as pluses. The top of the scrreen is always north. So if a target is seen on the bottom right hand side of the display, it is approximately south-east of you. This might be over your bow, or on your starboard beam.
SO: Sonar
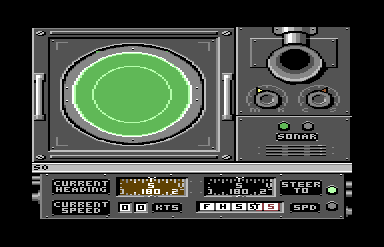
The only way to see a submerged submarine is to use the Sonar. Some course corrections may be needled depending on what is seen on tlhe sonar therefore, the Helm controls are duplicated here. Sonar works on the principal of sending sound waves through the water and timing how long they take to return after bouncing off of an enemy submarine. The direction of the transponder (sonar “antenna”) determines the range. This sonar will show the position of enemy submarines (blips) within an approximate radius of 13,500 yards around you, as well as the positions of islands. But beware: sudden, fast-moving blips heading toward you are torpedoes!
GF: Gun Forward
GA: Gun Aft
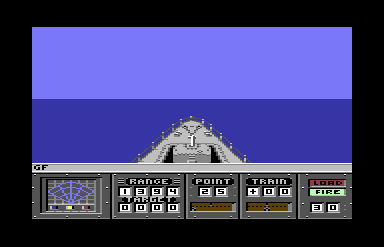
When enemy shjps are nearby, the 5” guns may be used to fire on them. The guns are also used to support the marines when they hit the beach. Each time the gun is fired, it will take several seconds to reload it. Repeated hits are required to sink a ship or eliminate a gun emplacement.
These Stations show the ocean, the 5" gun, the bow or stern, and a set of controls and indicators. General fire control follows the follwing procedures. Keep in mind that it may be more difficullt to shoot freehand than with the targeting radar.
-
Move the gun up or down (change the Point) by pushing the joystick FORWARD/UP or pulling BACK/DOWN
-
Move the gun left or right (change the Train) by moving the joystick LEFT or RIGHT (or by using cursor keys). As the gun moves, you will notice the indicators change.
-
Press the FIRE button (Space Bar) each time you wish to fire the gun.
-
Wait to reload, then continue firing on selected targets, making adjustments as needed. Be sure to watch the number of rounds you have left.
You can also select and lock the radar onto a target by using your sweep controls.
-
Type TR for Targeting Radar, then press RETURN. This will activate the Radar Sweep Display on the lower left corner of the station, and the blue light below it will flash. (This will be red if the radar is damaged.)
-
Move the joystick LEFT or RIGHT to move the sweep left or right.
-
Line up the sweep with one of the blips shown on the radar screen, then press the FIRE button (Space Bar).
-
The yellow light will flash below the radar, indicating that it is calculating. As soon as the green light flashes, the target has been locked in.
-
Line up the top pointers under TRAIN and POINT with those pointers underneath (controlled by radar) by moving the joystick RIGHT, LEFT, FORWARD/UP and BACK/DOWN.
-
When the pointers connect, press the FIRE button (Space bar) to shoot.
-
Wait to reload, and continue the same process until you’ve eliminated your target, then select another.
INDICATORS:
Train: The number of degrees that the gun is off the centerline of the ship. Positve ( + ) values are to the right and negative ( - ) values are to the left. Point: The number of degrees that the gun is off the horizon. The maximum is 50°, the minimum is 0° and the maximum range is at 45°. Range: How far the radar locked target is in yards. Target: How far away the shell from the gun will land at the given point value. Rounds Left: The two-digit number on the bottom right of the screen which indicates the number of shell left for that gun. Reload: Flashes to show that reloading is in process. Fire: Flashes green when ready to shoot.
AP: Anti-Aircraft Gun Port
AS: Anti-Aircraft Gun Starboard
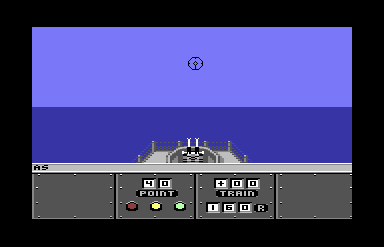
When attacked by enemy warplanes, use these rapid fire guns to shoot back. But remember, they have no effect against ships, submarines, or islands. The screen shows the port or starboard view of the ocean, along with any attacking aircraft that are close enough to be seen in that direction.
-
Push the joystick FORWARD/UP or pull BACK/DOWN to move the gun up or down (to change the Pointing).
-
Move the joystick RIGHT or LEFT (or use the cursor keys) to move the gun right or left (to change the Train). As the gun moves you will notice the indicators change.
-
To target and shoot at a plane, move the joystick so that the cross-hairs are on the plane, then press the FIRE button (Space Bar). You may push the FIRE button (Space Bar) once for single shots, or hold down for a faster pulse of shells. Watch your temperature light!
INDICATORS:
Train: The number of degrees that the gun is off the centerline of the ship. Positive ( +) values are to the right, and negative ( - ) values are to the left. Point: The number of degrees that the gun is off the horizon. The maximum is 50°, the minimum is 0° and the maximum range is at 45 °. R: Indicates rounds per minute. The longer you continue to fire, the slower the rounds per minute. Temperature Lights: (Green, Yellow, Red correspond to the R: readout above. A red light indicates that the gun is overheated and not functional. lt must be left alone for several seconds so that it may cool. Scoreboards: On the right and left bottom parts of the screen is a running total of the number of aircraft destroyed by that gun. A plane appears here for each one destroyed.
TP: Torpedoes Port
TS: Torpedoes Starboard
Torpedoes were used to destroy other ships at ranges greater than the guns. They were the only effective way of attacking a cruiser or battleship, as the destroyer’s guns could not penetrate the big ships armor plating. Torpedoes are not resupplied - once used, there are no more available for that mission. This station shows the view from the side of the ship (port or starboard), along with the torpedo mount. Below this are the controls and indicators.
- Move the joystick RIGHT or LEFT to move the torpedo mount when the range marker (aiming point) is over a ship.
- Press the FIRE button (Space Bar) to launch a torpedo. If the distance is great you will have to ’lead’ the target ship by aiming in front of it.
Note: Keep in mind that both you and the target are moving and probably not parallel to each other.
INDICATORS:
Tube Number: Each torpedo (of the five per side) is automatically selected for you. Each time you fire one, the light will turn red. When the next light flashes green, you are ready to launch another torpedo. Status Lights: (Red/Green) When the Status light (under the station number) is green, the torpedo is operational. If it is red, then damage has occurred and you must wait until Damage Control has fixed it. Train: The number of degrees that the gun is off the centerline of the ship. Positive ( + ) values are to the right, and negative ( - ) values are to the left.
DC: Depth Charge
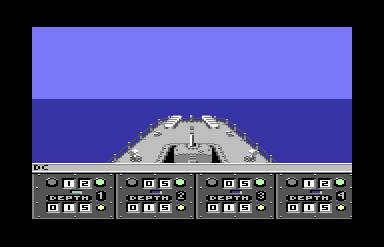
Depth Charges are used to destroy enemy submarines. They are basically very similar to airplane bombs but are dropped through the water. Instead of striking the ground they are designed to detonate at a certain depth. By varying the pattern and depth settings of depth charges, you can bracket the enemy sub and hopefully destroy it.
This station shows the view looking over the stern section of the ship. The depth charge launchers are shown in the view. There are two K-guns that shoot depth charges off the side, and two stern racks that. roll them off the back. Below the view are the controls, and indicators to select, fuse and fire the depth charges.
-
To select one of the four launchers, move the joystick RIGHT or LEFT. The blue light will flash, indicating which launcher has been selected
-
Depth settings are controlled by pushing the joystick FORWARD/UP or pulling BACK/DOWN to increase or decrease the depth setting.
-
To fire a depth charge press the FIRE button (Space Bar). The depth charge will be launched into the water and will explode at the depth setting shown for that launcher. While the launcher flashes red, it is not operational.
INDICATORS:
Select Launcher: Flashes blue to show you which of the four launchers is selected. Depth Charges Remaining: The two-digit number displays how many depth charges are still available to fire from that launcher. Status: (Red/Green) Immediately after a depth charge is launched, the status light will show red since the launcher must reload. When the launcher is ready to fire, the status ligtht will glow green. When a launcher is damaged, both the lights will flash.
DA: Damage Control
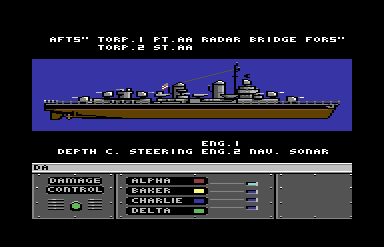
When you have received damage from enemy attacks, the damage control parties will attempt to fix it for you. The four damage control parties can be manually reassigned to any damaged stations from Damage Control.
The station shows each major item on the ship listed both above and below a side view of a Fletcher class destroyer. Below this display are the four damage control teams in order of their repair speed: Alpha, Baker, Charlie and Delta.
-Select a team by pushing the joystick FORWARD/UP or pulling it BACK/DOWN. The blue light will flash, indicating which team has been selected.
-
Select the station to be repaired by moving the joystick RIGHT or LEFT (or by using the cursor keys). The selected item will turn the chosen repair team’s color.
-
Press the FIRE button (Space Bar) to receive a report on that station from its repair crew. Then assign another team, if needed, or move the present team elsewhere.
-
To “turn off” a crew, cycle it through the list with the joystick and exit the screen at the top left or bottom right.
INDICATORS:
Team Colors: Alpha-Red, Baker-Yellow, Charlie-Blue, Delta-Green Damage: Indicated when an area flashes Repairs: Shown as being underway when the one of the ship’s stations or areas is highlighted.
Note: The damage control team resupplies ammunition (except torpedoes, which are not replaced) when repairs are complete.
CAPTAIN’S NOTES
Call them “tin cans,” “greyhounds,” or “small boys,” these small, fast ships were called upon to do an amazing variety of tasks throughout World War II. Ready to fight off hostile dive bombers, trading shots wilh enemy destroyers, cruisers, and even battleships, or waging a cat-and-mouse war with submarines, these were the destroyers and destroyer escorts of the U.S. Navy. They were scouts, gun platforms, weather reporters, blockaders, troop and supply transports, front-line guards, search and rescue ships, radar pickets, mail deliverers and surface raiders. They could do everything from dropping a small party of scouts on a tiny Pacific atoll to supporting a vast fleet in the invasion of a continent.
When the United States entered World War II in December of 1941, the navy had a.bout 172 destroyers on hand, with 72 of these being World War I vintage ships. By the middle of 1942, the first of the new DD-445 class ships, the Fletcher, was underway. A total of 175 ships of this class were eventually built although two more destroyer types (the Sumner and Gearing classes) were manufactured in the last year of the war, the Fletcher remained the front-line destroyer of World War II.
Weapons
Guns: The Fletcher’s main armament was her five 5-inch/38 caliber dual-purpose, semi-automatic guns used for anti-aircraft, shore bombardment and surface firing. They could use a variety of ammunition, including common, armor-piercing, illumination, variable time, and proximity-fused shells. These anti–aircraft shells, held a miniature radio transceiver which would explode the shell when it came near the target. The 5-inch/38 caliber gun could fire on a surface target some nine miles away or at air targets up to five miles high. Although the guns could be sighted and fired from within, they usually were controlled from the gun director station sitting high above the bridge by using a fire-control radar and onboard computers to calculate the target’s position.
The secondary battery was composed of the 40 mm rapid-fire, automatic water cooled twin guns. These anti-aircraft guns were capable of firing about 160 rounds per minute to about 2800 yards and could also be controlled by remote.
For close-in defense, there were the 20 mm air-cooled automatic anti-aircraft guns. Manually controlled, they had an effective range of about 3500 yards. It’s said that when the crew members deep inside the ship heard the distinctive chatter of these 20 mm guns firing, it served as the warning of an imminent crash by a Kamikaze aircraft.
Torpedoes: The Fletchers conventionality carried ten 21" diameter torpedoes in two or quintuple mounts along the centerline. These mounts could rotate 360 degrees to fire off of either side of the ship. The torpedoes were propelled by an air-alcohol-water-gas-turbine system capable of sending the 2215 pound ‘fish’ with it’s 780-pound explosive charge some three miles at 45 knots or some seven miles at 25 knots. The U.S. torpedo was plagued by difficulties during the war and could not match the performance of the Japanese-designed “Long Lance”’ torpedo. These oxygen-driven practically wakeless 24" torpedoes carried a 1,000-pound explosive and ran approximately eleven miles at 50 knots or thirty miles at 36 knots.
Depth Charges: The main anti-submarine weapon of the destroyer was the 36-inch long, 18" diameter depth charge, or “ash can”. Containing some 300 to 600 pounds of TNT, these deadly devices were activated by variable depth fuses which were basically bellows, operated by water pressure. Later, a teardrop shaped depth charge was developed, which was more accurate due to its streamlined shape. The Fletchers usually carried six depth charge projectors (K-Guns) - three on each side-and two racks to roll charges off the stern.
Sensing
The first American search radar set off to sea in 1937. Later improvements produced surface and air search radars. Quite often, radar was used to catch an unsuspecting submarine carelessly loittering on the surface.
As early as 1934, the United States was experimenting with echo ranging devices, and by 1939, some 60 destroyers in the U.S. fleet were equipped with sonar. Only highly trained and experienced men were skilled enough to make sense of the “pings” returned from an unidentified object amid the undersea noise.
Engineering
The most important mechanical system on board was the engineering section. To provide the ship with electricity, heat, ventilation, fresh water, and power, the engineering plant consisted of a myriad of boilers, engines, pumps, motors, and generators. Actual design allowed for two separate systems - each capable of running the ship in the event of damage to the other.
Crew
The crew consisted of 306 enlisted men and 19 officers, lead by the commanding officer (always called the Captain, regardless of his military rank). He was responsible for the ship as a whole, its safety and operation, and the performance and welfare of the crew. The Executive Officer (“Exec”) assisted the Captain, and beneath him were the various departmental officers - including gunnery, construction and repair, navigation, engineering, and supply.
When in a war zone, about one-third of the crew was on duty at all times. Three rotating watch sections had four hours “on” and eight hours “off.”. “General Quarters” (Battle Condition 1) was sounded when enemy contact was made, unidentified planes or ships approached, or at dawn and dusk when bad visibility made operations hazardous. All hands reported to their battle stations immediately. Under Battle conditions 2 and 3 (war cruising), all sensors and lookout stations were manned and half the armament was ready for action.
Glossary of Ship Terms:
The Stern, Bow, Deck, Hull, Bridge, Centerline are all parts of a ship.
Stern: The rear section of the ship. Bow: The front section of the ship. Deck: A platform extending from one side of a ship to the other. Hull : The body of the ship. Bridge: The “brain” of the ship from which the Captain normally gives orders. Centerline: The centre of the ship, from bow to stern.
Port, Starboard; Aft; and Fore are usually used to describe the relative location of an object in relation to the ship.
Port: The left side of the ship if you are looking at the bow . Starboard: The right side of the ship if you are lookirg at the bow. Aft: Towards the rear section (stern) of the ship. Fore: Towards the front section (bow) of the ship. Amidships: Midway between the bow and the stern.
These terms have to do with steering the ship or controlling weapons.
Heading: The direction on the compass that the ship is travelling. Bearing: The direction on the compass that an object is from your ship. Point: The angle (number of degrees) that is up or down from the horizon. Train: The angle (number of degrees) of a weapon from its normal position, usually centerline or at a right angle to centerline of the ship.
GENERAL DATA
Dimensions LENGTH: Waterline 369’ 3" Overall 376’ 6’’ BEAM: 39’ 8" DRAFT: Full Load 17’ 9" DISPLACEMENT: Standard 2050 tons Full Load 3050 tons
Liquid Load FUEL OIL: 137,740 gal. DIESEL OIL: 6,772 gal. POTABLE WATER: 16,939 gal
Machinery BOILERS: FOUR Babcock & Wilcox double furnaces, express type, water tube (M-type). STEAM PRESSURE: 615 psi STEAM TEMPERATURE: Saturated - 490°F. Superheated -850°F. ENGINES: TWO Westinghouse double-reduction geared turbines. Shaft Horsepower - 60,000 Propellers TWO Speed - 36 knots Cruising radius at 15 knots - 6,000 miles
Armament FIVE 5"/38 caliber dual purpose Surface Range: 18,200 yards at 45° elevation Air Range: 37,200 feet at 85° elevation
TEN 40 mm Anti-Aircraft Surface Range: 11,000 yards at 42° elevation Air Range: 10,000 feet at 90° elevation
SEVEN 20 mm Anti-Aircraft Surface Range: 4,800 yards at 35° elevation Air Range: 10,000 feet at 90° elevation
TEN 21" torpedo tubes in two quintuple banks
TWO Depth Charge Tracks
SIX Depth Charge Projectors (K-Guns)
CREDITS
Game design by Michael Kosaka.
Original Game Programming on C64 by Chuck Sommerville.
C64 graphics by Michael Kosaka.