Controls
| Joystick | Action |
|---|---|
| UP | Up |
| DOWN | Down |
| LEFT | Left |
| RIGHT | Right |
| ◯ ⬤ | Fire |
| ⬤ ◯ | Fire |
| ◸ ◥ | Fire |
| ◤ ◹ | Start |
| ●○○○ | Set Difficulty |
Iridis Alpha
Control a Gilby. Lose energy when you're hit. Gain energy when you destroy an enemy. Too little or too much energy and your Gilby explodes. Check your ship's color. Dark is low on energy, bright is high. Transfer or receive energy by landing at the Core area. There's so much more to this game.
Scenario
SCREEN DISPLAY
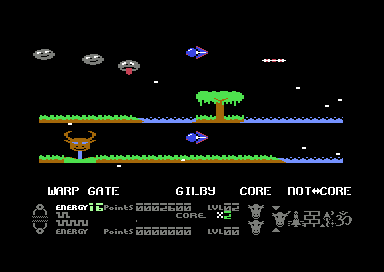
After the initial screens your Gilby Robot Fighter warps into the first of five upper planets displayed in the top third of your screen. The middle third of the screen initially shows the design of the Warp Gate on the planet, the design of the Core Area and the design of the non-Core Area. This section of the screen is replaced by a display of a lower, mirror-image planet when you have destroyed three or more waves on the upper planet. The control panel occupies the lowest section of the screen (see illustration below).
The Control Panel
ENERGY STATUS Your energy grows when you destroy items and falls when you collide with items. If your energy climbs too high or falls too low your Gilby will explode. The length of the energy line on the control panel shows your current energy status and this is also indicated by the colour of your ship (white is dangerously high, black is dangerously low).
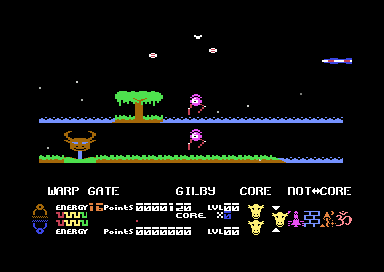
CORE ENERGY You can transfer energy to or recover energy from the Core Area by flying over the Core Area and stopping. Your Gilby will land. You can fire from the ground. To take off run to the edge of the Core Area and jump up. When the Core Area energy is full up you will transfer automatically to the bonus phase.
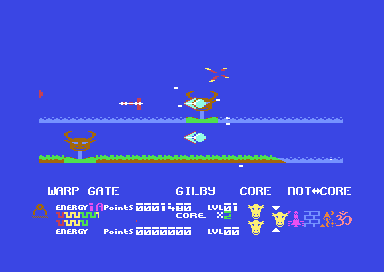
TRANSFERRING TO THE LOWER PLANET After you have destroyed three waves the lower planet will appear. To transfer to it you must find an alien which turns into a spinning ring for a few seconds when you destroy it. Stop firing and fly through the ring and you will transfer. To return to the upper planet find a similar spinning ring and fly through it.
PLANET ENTROPY Both upper and lower planets have an entropy which decays when they are not in use. The entropy status of each planet is shown at the far left of the control panel. If either entropy level falls too low your Gilby is destroyed.
WARPING TO A NEW PLANET When you have destroyed enough attacking waves you are able to warp to another planet. The Next Planet Pointers at the far right of the control panel indicate your current destination. To Warp to a new planet find the Warp Gate on either the upper or lower planet, stop firing and fly through the Gate.
PROGRESS SCREEN The Progress Screen appears every time you complete a group of attack waves. You may cancel it by pressing the fire button. The screen shows the twenty waves for each planet and illuminates each wave as it is completed. Your current wave is shown in red.
SCORING Points are earned for each enemy destroyed. The rate of scoring is shown as a points multiplier at the centre right of the control panel and varies from \xD70 (times zero when stationary) to \xD78 (times eight when at maximum speed).
Game Tactics
-
The first three levels are all single-planet. Practise flying Gilby about, landing on the Core, jumping around and taking off, and of course, shooting. It’s important that you grasp the idea of Gilby LOSING energy each time he’s hit and GAINING an equivalent amount of energy each time he kills an enemy. Be aware that you can have too much energy, as well as the more obvious situation of having too little. Keep an eye on Gilby’s colour as you play. If the colour is dark - black, blue or red - then Gilby is low on energy. If the colour is bright, for example yellow or white, then Gilby is getting very full and you had better be looking to offload some.
-
You get rid of excess energy in either of two ways: by deliberate collisions with enemy ships, or better still by dropping it off in the Core. To land on the Core and transfer your energy, just fly to the Core, stop overhead, and release the FIRE button, whereupon Gilby will drop to the deck and the energy will be dumped. To leave the Core, you must walk Gilby off the Core surface and then leap into the air and fly. If you leap while you’re on the Core, you just perform graceful lunar-type leaps.
You may still fire at the enemy when you’re on the Core, but you get different types of shots to those of an airborne Gilby.
-
Use the first three levels to get used to all this. Press Q to quit if the going gets tough or confusing, and just keep running those three simple levels until you’ve mastered the controls and are ready for the second planet.
-
After you finish Level Three the progress chart comes up with your completed waves on it, and highlighted icons representing your possible destinations amongst the planets of Iridis. This chart makes a regular appearance as you progress through the game; each time a new planet becomes available the chart pops up. You can also call it up anytime during play by pressing SPACE. Just press FIRE to leave the chart display and return to gameplay.
-
With the lower planet activated, your next priority is to learn how to transfer control from top to bottom and vice versa. Although both Gilbies are displayed, only one at a time is active. The non-active Gilby is rendered in neutral grey, so don’t try to control a grey Gilby!
-
To make a transfer, you have to do three things: firstly, shoot any alien that produces a spinning ring when shot. You see these rings when you shoot most things; they look a little like flashy Polo mints. Shoot your alien to get the ring, then release the FIRE button, and fly through the ring. You’ll then have transferred control to the opposing Gilby. (Learning to transfer is the most essential manoeuvre in Iridis gameplay. Take time to learn it well).
-
During 95% of the time you’re playing Iridis, you should hold down the FIRE button. Fire is automatic and rapid. You only release the button if you’ve too much energy and don’t want to shoot anything for fear of blowing up, or if you are wanting to transfer or land on the Core. You see, you have to make a conscious effort to let go of the button to make a transfer or landing. When you get used to the idea that you can NEVER transfer or land while you’ve got that button pressed, you’ll find that you rarely, if ever, make unwanted transfers or landings.
-
The unused Gilby of the pair will decay if unused, and eventually blow up. By transferring regularly, you ‘recharge’ both Gilbies thus avoiding an untimely demise. Keep an eye on the Entropy Gauge in the lower left of the screen. Both Gilbies are represented there; the unused Gilby in the gauge gets darkest as it decays. If you look there and one of the Gilby-icons is blue or black, better transfer quickly. To remind you if you forget, the last four seconds before death due to not transferring are indicated by a violently-strobing screen. If you get these heavy strobes, transfer promptly and you’ll be safe.
-
The Warp Gate, as well as being another means of avoiding Gilby decay, is your means of transport between the planets of Iridis Alpha. Over on the right hand edge of the control panel are five icons representing the planets. You’ll notice little pointers over some of the icons. Each time you shoot something the pointer will switch between the icons representing the available warp destinations. In the early stages, that’ll be only a couple of icons; as you open up more of the game, more destinations become available. To go to a destination, fly to near the Warp Gate, shoot until the pointer is aligned on the icon representing your chosen planet, then fly into the Warp Gate.
Iridis shows a way for the shoot-em-up to evolve, gaining depth and a degree of complexity, but still remaining playable and very ‘blastable’. Whereas many blasting games become boring very quickly, lacking any objective beyond mere destruction of alien ships, Iridis gives the player plenty to think about. We’re just trying to show that shoot-em-ups don’t by any means have to be ‘mindless’…
So give ’em hell - but think about it…
CREDITS
Designed and programmed by: Jeff Minter