Controls
| Joystick | Action |
|---|---|
| UP | Up |
| DOWN | Down |
| LEFT | Left |
| RIGHT | Right |
| ◯ ⬤ | Fire |
| ⬤ ◯ | Fire |
| ◸ ◥ | Fire |
| ◤ ◹ | Fire |
Paradroid
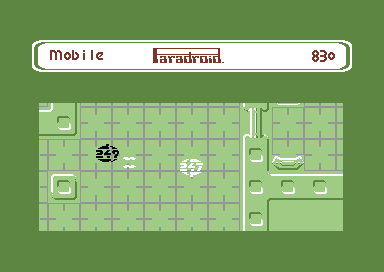
Clear each space freighter of rogue robots. Destroy them with lasers or by transferring control. Your robot is mobile by default. Push a UP/DOWN/LEFT/RIGHT and FIRE to shoot in that direction. Push FIRE when stationary then bump into another robot to capture it. Now play the energy transfer sub-game. Use computer consoles for maps and information and use lifts to visit other decks.
Scenario
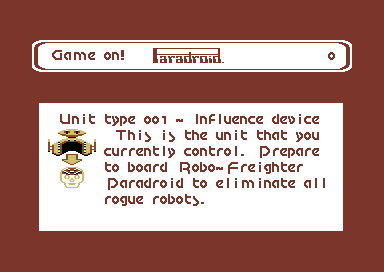
Reports indicate that the droid crew of a galactic space freighter has turned against their masters. A droid “Influence Device” has been beamed aboard to help you regain control of the situation. Use the Influence Device to destroy the droids by shooting them, ramming them, or temporarily taking control of a droid’s circuitry (transferring) to redirect its energy and armaments against its own kind. Your goal is to clear all droids from each of the space freighter’s 20 decks. When you have completely cleared a deck of droids, the ship’s computer shuts down the deck lights and you are awarded bonus points.
Playing the Game
Game Options
During the title sequence, use the following keys to set up Paradroid to your specifications:
| Key | Function |
|---|---|
| f1 | Color display (default) |
| f2 | Monochrome display |
| f5 | Increase music volume |
| f6 | Decrease music volume |
You can pause during game play by pressing the RUN/STOP key, although you can’t pause the game while you attempt to “transfer” to a new droid. During a pause, use the following keys to make adjustments:
Note: You can suspend a game any time by pressing the MENU button on THEC64 Joystick.
| Key | Function |
|---|---|
| f1 | Color display |
| f2 | Monochrome display |
| f7 | Stop animation |
| f8 | Restart animation |
| CLR/HOME | Abandon game |
| RUN/STOP | Resume game (or FIRE) |
The Influence Device
The Influence Device, identified by the serial number 001, is a comparatively low-powered machine. Move the Influence Device around the space freighter by pushing the joystick in the direction that you want the Influence Device to move.
If your Influence Device is destroyed, the game is over – droids win, you lose.
Influence Device Weapon System
The Influence Device has low-powered, twin lasers that are activated by pressing the FIRE button while the Influence Device is moving. The lasers fire in the same direction that the Influence Device moves.
To FIRE without moving very much, fire a shot in any direction and continue to hold the FIRE button down. With the FIRE button still depressed, let the joystick return to its centre position. Jab the joystick quickly in the direction you wish to fire. The laser will shoot in the direction that you jabbed the joystick.
In a similar way, you can fire the lasers behind you while you run away in the opposite direction. Press and hold the FIRE button and quickly jab the joystick in the opposite direction that you are moving. Then, quickly return the joystick to its original position to keep you moving after the laser fires.
In addition to firing your lasers, you can destroy weaker droids by ramming them repeatedly. However, you need to have “transferred” to a droid more powerful than the Influence Device before ramming is effective (see the section entitled “Transferring to a Droid”). Occasionally, you also may notice that the presence of your Influence Device among a group of droids causes the droids to attack each other.
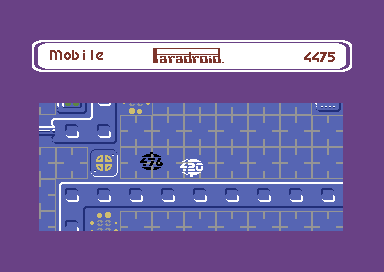
Droid Classification
Each droid has a three-digit serial number. The first digit indicates the class of that particular droid. The higher that digit is, the greater the power and sophistication of the driod. There are 24 different droid types grouped into 9 classes. The lowest droid classification is 1 and the highest is 9. Droid classification affects scoring when you shoot, ram, or take over a droid (see the section entitled “Scoring”).
Lower classes of droids have the same low-powered, twin laser weaponry that the Influence Device has. However, higher classes of droids have a more deadly, high-powered laser. Keep this in mind when considering whether or not to attempt to “transfer” to a particular droid.
Transferring to a Droid
Transferring to a droid, or temporarily taking control of its circuitry, is a key element of strategy in Paradroid. When you successfully transfer to another droid, the Influence Device assumes all of the capabilities and characteristics of that particular droid (including its serial number). Virtually every droid has more power than the Influence Device, so it is important to master the technique of transferring. For example, the “host” droid might have more sophisticated weaponry than the Influence Device, or be better able to withstand direct hits from droid lasers. You can find out more about the individual characteristics of the various droids in the Droid Data Library on board the space freighter (see the section entitled “Some Important Devices Aboard the Space Freighter”).
In addition, the Influence Device, or any droid that you have transferred to (host droid), will begin to run out of energy after a period of time. When the energy level is low, the Influence Device or host droid will begin to flash. At this point, it is of the utmost importance to attempt to transfer to a new host droid. If you do not, the Influence Device or current host droid will burn out.
Note: Energy loss caused by laser damage can be restored – for a price – by using one of the space freighter’s “Energisers” (see the section entitled “Some Important Devices Aboard the Space Freighter”).
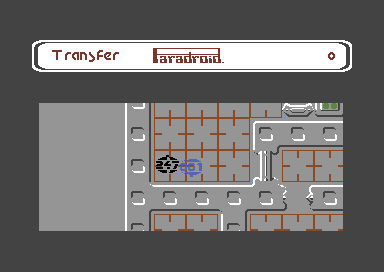
To transfer to a droid, first make sure the joystick is in its center position, then press and continue to hold down the FIRE button. The word “Transfer” will appear in the upper left-hand corner of the screen and the Influence Device or host droid will change colour to indicate that the Influence Device or host droid is ready to attempt to transfer. Then, with the button still held down, locate the target droid and ram into it with the Influence Device or host droid. After the collision, a screen describing your current status appears, followed by a screen that describes the target droid.
Next, prepare to engage in a battle for control of the droid’s circuit board. You’ll see a screen that looks like a circuit diagram with a column of rectangular boxes in the middle. Your goal in this battle with the droid’s processor is to set at least 7 of the 12 rectangles that appear in the centre of the screen to the colour that is controlled by the side of the circuit that you choose to operate.
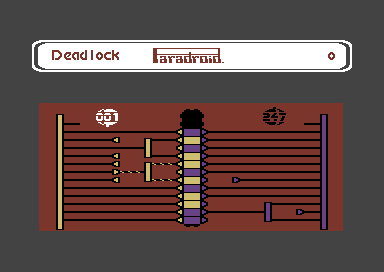
You have the choice of which side of the circuit board you wish to work from. It’s a race against time as well as the droid’s processor, so choose a side quickly by pushing the joystick either left or right and pressing the fire button to choose. Experience will teach you how to size up the situation quickly and choose the side from which you have the best chance to win. The droid’s processor controls the opposite side.
Once you have selected one side or the other, push the joystick UP/forward or DOWN/back to move the “pulser” vertically from one wire to the next. Press the FIRE button when you reach a wire with a clear path to one or more of the centre rectangles of the processor’s colour. The rectangle(s) will change to your colour. If the rectangle is already your color, you waste a pulser by pressing the fire button. The droid’s processor will be activating pulsers too, so a rectangle with your color may change to the processor’s color.
You have a limited number of pulsers to work with, so choose wisely. Learn to identify those wires which provide a clear path to one or more rectangles. Some wires short circuit your pulser before it can reach the rectanges. Other wires, when activated, sned a constant pulse to the rectangle and can’t be changed by the droid’s processor. Sill other wires contain a fork or multiple forks that lead to more than one rectangle. Watch out for “Terminators,” “Joiners,” and “Color Switchers.” You’re better off sticking with “Autopulsers” and “Splitters.”
If at least 7 of the rectangles are of the color controlled by your side of the circuit when time expires, the transfer will be successful and the Influence Device or current host droid will assume the serial number and characteristics of the new host droid (the word “Complete” will appear in the upper left-hand corner of the screen). A deadlock occurs if 6 of the rectangles are your color and the battle will begin again (the work “Deadlock” will appear in the upper left-hand corner of the screen). If fewer than 6 rectangles are your color when time runs out, the attempted transfer is rejected (the word “Rejected” will appear in the upper left-hand corner of the screen).
Transfers result in the destruction of the current host droid. If the transfer is unsuccessful, your droid returns to Influence Device status (serial number 001). If the Influence Device attempts to transfer without a current host and fails, it will be destroyed and the game will end.
Some Important Devices Aboard the Space Freighter
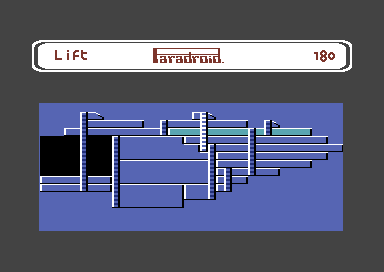
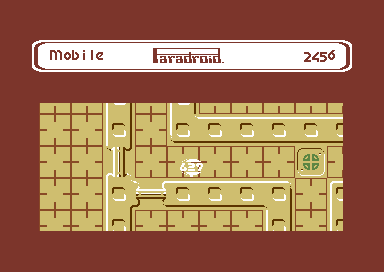
Lifts: Lifts enable you to move from one deck to another. They are represented by colored circles on each deck. To use a lift, move the Influence Device or host droid over the lift and press the fire button. A side view of the decks of the freighter appears. Push the joystick forward or pull it back to select the deck you wish to move to, then press the fire button.
Energisers
Energisers restore energy loss caused by laser damage to the Influence Device or host droid, but points are deducted from your score for each second that you use an energizer (see “Scoring”). Energisers are the flashing lights that appear on each deck. To use an Energiser, simply position the Influence Device or host droid over it.
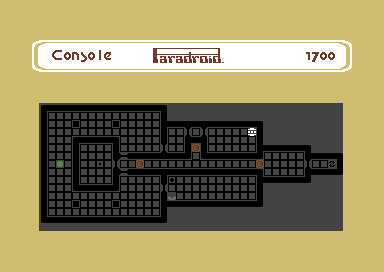
Consoles
Consoles provide information about droids and the space freighter itself. Consoles are somewhat U-shaped. To use a console, move the Influence Device or host droid to a console and press the fire button. Four choices appear.
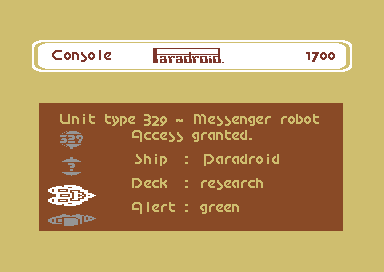
Push the joystick UP/forward or pull it DOWN/back to move to the option of your choice, and then press the FIRE button to select it. To return to the console menu after making a selection from it, press the FIRE button. Here’s some information about each of the four choices:
| Icon | Description |
|---|---|
| Droid | Return to the game |
| Query | Gain access to the Droid Data Library. You can view data about any droids that are of lower rank than your current host. Push the joystick UP/forward or pull it DOWN/back to see each droid. For further information about a particular droid, push the joystick LEFT or RIGHT |
| Deck | View the deck you’re on. Maps out lifts, consoles and energise points as well as present location |
| Ship | See the entire freighter from a side perspective |
Scoring
| Action | Droid Class | Points |
|---|---|---|
| Ramming | 1-8 | Class x 10 |
| Ramming | 9 | Class x 100 |
| Shooting/Transferring | 1-8 | Class x 25 |
| Shooting/Transferring | 9 | Class x 250 |
| Transfer failure | 1-8 | Class x -10 |
| Transfer failure | 9 | Class x -100 |
Alert Status
Alert status is shown on most decks wherever you see the word “ALERT” and is usually green. If you destroy droids quickly, the alert status changes to yellow, amber or red, depending on how quickly you’re able to destroy droids. Alert status affects scoring. You are awarded maximum extra points when you destroy droids under a red alert.
| Alert | Points (per second) |
|---|---|
| Yellow | 5 |
| Amber | 10 |
| Red | 25 |
Deck/Ship clearance bonus 500/2000 points

Energise penalty -5 points per second
If your score qualifies as the highest or lowest, you’ll be prompted to enter your initials. To do so, push the joystick LEFT or RIGHT until the letter you want to select appears. Then press the FIRE button. Repeat the procedure for the second and third letters.
Credits
PROGRAMMER: Andrew Braybrook
MUSICIAN: Steve Turner